Showing posts with label BYS. Show all posts

Tuesday, September 3, 2013

BYS Nail Enamel Duo: Three's A Crowd

Hi guys! Today I have a review of one of the BYS Nail Enamel Duos to share with you. This duo is the Three's A Crowd duo. On one side it has a white nail polish, and on the other side it has a hot pink-y purple colour.


The white polish is okay for a white. Not super opaque but still quite nice. It applied smoothly but as you would expect from a white, it's a little streaky on the first coat but it was opaque on the second. :) It sort of dried to a satin finish, also.


The pink-y purple side is quite nice. It looks a bit more pink on the nails than it does in the bottle. It's also a jelly finish, and it dries to a matte satin finish. It also is a little more neon than I thought it would be! This would be a beautiful pedicure colour for summer! I used 2 coats.
{ Please excuse the little mess up on my middle finger. :( }

 ^ Photo taken with flash

I really liked the polish brushes on this duo! I found it really easy to get a clean line and control the brush. The formulas on the polishes were also quite nice and easy to apply.

You can pick up this duo as well as a few other colours on Fashion Addict for $4.95. {I can't find this exact colour in stock at the moment, so I don't know what's up there, but you can check out some of the other duos on this page.}

Fashion Addict

*Product(s) in this post were provided to me by the company or PR for my 100% honest review. For more info please read my Disclosure Policy*

Wednesday, August 28, 2013

BYS Caviar For Nails - Fashionista

Hi guys! Today I have another nail art kit from BYS to share with you. I showed you the Glitter for Nails in Moonlight Magic last week.

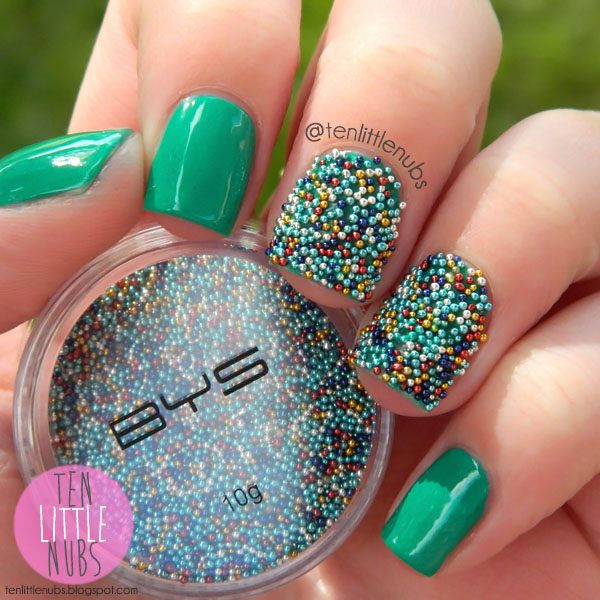
This is the Caviar for Nails kit in Fashionista. In the kit you get a green nail polish, the little pot with the microbeads (caviar) and a little brush to clean up the excess (not pictured).


This kit is really easy to use. You just paint your nail, dip your nail into the pot and then brush off any excess beads. I also pushed down on the beads lightly to make sure they're stuck into the nail polish. I found this a lot easier and much less messy than the Glitter for Nails kit.
This was my first time doing caviar nails and it actually looks pretty cool. It's not something I'd wear all the time of course and I don't know if the beads would last longer than a day but it does look interesting!


Honestly, I mostly wanted to try this kit because I love the turquoise-y green polish that comes in the kit! It is so pretty! :) It's fairly thick and not the nicest to apply but it does self-level which is good, and to fix the thickness I'll just add a little thinner to it.


You can pick up the BYS Glitter Dust for Nails kit on Fashion Addict {Aus only shipping for nail polish and fragrances} for $7.95. The kit comes in many different colours and they also have a lot of other fun nail kits to try out. :)

Fashion Addict

*Product(s) in this post were provided to me by the company or PR for my 100% honest review. For more info please read my Disclosure Policy*

Saturday, August 24, 2013

BYS Glitter Dust For Nails - Moonlight Magic

Hi guys! Today I have a review of the BYS Glitter Dust kit in Moonlight Magic to share with you. This was sent to me by a website called Fashion Addict. They sell a lot of beauty/nail items, as well as jewellery, accessories and handbags.


In this kit you get a glitter pot, a corresponding nail polish colour and a little brush for cleaning up excess glitter (not pictured).
I watched this video by BYS to see how they recommend to apply it, and I did exactly as they instructed in the video: I applied a coat of the blue polish, dipped my nail into the glitter pot and brushed off the excess.
The polish colour in this kit is a nice mid tone blue colour but the nail polish itself is quite sheer so I wouldn't see myself using the polish alone.
I have to say, I found it a bit hard to dip my nail into the glitter pot since it is quite small. I would only get glitter on half of my nail and it was a bit awkward to do. I watched this video by simplyrins since then, and she says to push the glitter to one side of the pot which will make it easier to dip the nail into. :) I wish I'd watched that video before I did this because it would have been much easier for me.
I also found it especially hard to clean up the excess glitters on my fingers for some reason, lol. I got glitter everywhere. I should have rinsed my hands before I took the photos below because in the photos you can see them on my skin, LOL.


This is definitely not an everyday nail look for me or most people, haha, but it would be so fun for a party or special occasion. I only wore the glitter nails for an hour or so, so I'm not sure how it would last. Definitely best for a night out or something like that. :) These are by far the sparkliest nails I've ever worn! And they also don't feel as rough as you'd imagine either so that's a plus! They feel about the same as wearing a textured nail polish.


You can pick up the BYS Glitter Dust for Nails kit on Fashion Addict {Aus only shipping for nail polish and fragrances} for $7.95. The kit comes in 11 different colours and they also have a lot of other fun nail kits to try out. :) {I have another to show you soon!}

Have you tried any of the BYS nail art kits? I would love to know what you think!

Thanks for visiting! ♥
Fashion Addict

*Product(s) in this post were provided to me by the company or PR for my 100% honest review. For more info please read my Disclosure Policy*