Showing posts with label Gradient. Show all posts

Tuesday, November 5, 2013

Getting Back Into Stamping.

I've been wanting to get back into doing more nail art recently, but I'm not very good at coming up with ideas; hence why I'm always doing 'inspired' manicures.
Well, today's nail art is inspired by something - but it's not somebody else's nail art.

I started by creating a gradient with Essie A Crewed Interest, Revlon Buttercup and Essie Mint Candy Apple. My gradient was inspired by this picture from Pinterest. :)
{ I have a gradient tutorial video here if you are interested in seeing how I did this. }

I have been wanting to work on my stamping skills also, and I felt the gradient was too plain.
I stamped over the gradient using the flip flop images from Bundle Monster plate BM-309. I used this black polish from Born Pretty to stamp with. I kind of wish I hadn't stamped over the gradient - it looked prettier on its own. Oh well. *sigh*


Thanks for visiting! ♥

Friday, September 6, 2013

Ulta3 The Big Book of Nails + Nail Art Kit Review

Hey lovelies! Happy Friday! :) I'm excited because the Royal Adelaide Show starts today. I'll probably go this weekend! What are you getting up to this weekend?

For today's post I have something I think is really awesome and exciting to share with you.

In August, Ulta3 has released something awesome for all the nail art addicts as well as polish newbies. The Ulta3 Big Book of Nails. This is a kit that includes 16 of Ulta3's polishes, all in a really cool book-type of box! There's also a new Nail Art Tool Kit available to accompany the Big Book of Nails.


The polishes included in the Big Book of Nails are: Pink Peony, Pale Dahlia, Lilac Bloom, Corsican Rose, Fresh Squeezed, Fruit Punch, Tahitian Lime, Tangello Twist, Black Satin, Sizzling Red, Lily White, Hollywood, Over the Rainbow, Twinkle Toes, Gold Rush Fever, Silver Grey. So many great nail polishes, and pretty much all the essential colours for some fun nail art.
Lily White and Black Satin are my holy grail black & white polishes! They're fabulous for nail art and very opaque.


On the left side of the book you can see tutorials on how to create gradient, tape, dotticure and glitter manicures using the polishes included and the tools in the Nail Art Tool Kit.

The Nail Art Tool Kit contains 2 nail art sponges, 1 mixing plate, 1 double ended dotting tool and 1 nail art brush. The essentials for any nail art, basically!
(Please excuse the messy looking sponge! I forgot to take a photo of the kit before using it!)


I created a nail art manicure using the polishes from the Big Book of Nails and the Nail Art Tool Kit to give you guys an idea of what you can create using these kits! There are countless other looks you can create with both kits, however!

I used Lilac Bloom, Pale Dahlia, and Corsican Rose as the base colours on my pointer, middle & pinky fingers and used the dotting tool from the Nail Art Tool Kit to dot on some Lily White polka dots.
I really like the dotting tool that comes with this kit. It's a good size for creating polka dots.

On my ring finger and thumb, I used Lily White as my base, and using a sponge from the Nail Art Tool Kit I created a gradient with Lily White, Pale Dahlia and Pink Peony.
The sponge from the Nail Art Tool Kit is fairly similar to a kitchen sponge. I'm not quite sure if I would use it again to create a gradient (I usually use makeup sponges) because I didn't find it made the cleanest gradient and it also left some bubbles in the polish. Thankfully, my top coat smoothed out the bubbles a bit. :)


This kit would be perfect for someone starting their nail polish collection and wanting to start doing some easy nail art. Or any nail polish addict who can't resist a bargain, like myself. ;) It would also be a great gift idea!

The Big Book of Nails costs $21.95, so by purchasing it you're saving $10.05! (Ulta3 nail polishes retail for $2ea). The Nail Art Tool Kit costs $9.95.

Ulta3

*Product(s) in this post were provided to me by the company or PR for my 100% honest review. For more info please read my Disclosure Policy*

Friday, August 30, 2013

Fun Stamped Gradient + OPI Crown Me Already

I really need to come up with better post titles lol...

Hi guys! I've been saying recently that I've wanted to get more into nail art. I haven't had a lot of time or inspiration for it in the past week or so, but I sat down a couple of weeks ago, and decided to do some nail art while I caught up on Big Brother! :D I'm really into Big Brother this year but I'm soooo behind and have to catch up! Let me know if you're watching it too! :)
I did these nails a bit over a week ago but didn't really have a time to post them on the blog till today. :( I am itching to show you this because I really love it!

Anyway. My favourite type of nail art to do would have to be gradients or stamping. (So I've done a mani featuring both of those!) I can't often be bothered with gradients though, as they are quite messy and I don't want to deal with the clean up process! :P Stamping is also messy (mostly the workspace, though).


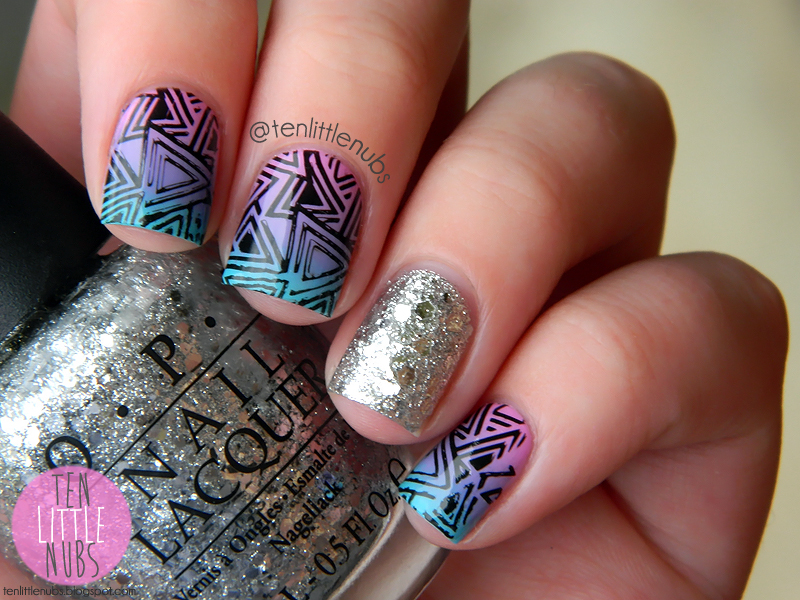
For my gradient I used a bubblegum pink colour from the Kmart BC Co brand, Shade 14, OPI Do You Lilac It, and Orly Frisky.
For the stamping I used this plate (QA66) from Born Pretty Store with their black stamping polish (which I LOVE). The plate was fairly good quality in my opinion. The image is kind of these triangle-y shapes. Haha. My stamping skills still aren't so great but I don't practice much so that's my fault I suppose. ;) I'm not good at placing the image lol.
I actually wasn't going to stamp over the gradient, but the gradient came out a bit weird-looking so I decided I needed to cover it up a little.


Lastly, on my ring finger I used OPI Crown Me Already, one of my all time favourite glitters! :D I only needed 2 coats of it, it's such a dense glitter! ♥
I actually lost some of this polish when I was staying at my auntie's house a while back. I had it packed with some other polishes and it leaked. :( Not too much, thankfully!


This time I tried a different method of cleaning up the cuticles for the gradient part, because it is so messy. I used some PVA glue! I've been using PVA glue for a while now as an easy removal method for glitter nail polish. (I recommend you read this post by Pretty Purple Polish about that!) But I recently read that you can use it for clean up also!
So we all remember in primary school when we used to paint PVA glue on our hands and then peel it off, right? It's the same thing! I just painted a generous amount of PVA glue all around my cuticles and skin surrounding my nail (making sure not to go too close to the cuticles - and don't get any on the nail!). Then I used a hair dryer on the low & cold setting and blew it on my nails for a little bit to dry the glue faster because I'm impatient (and it was late at night - ain't nobody got time fo' that). :) When that was totally dry I did my gradient as usual. Once I was finished with the gradient I just peeled off the dry glue and cleaned up whatever was left (which wasn't much) with my acetone + little makeup brush! :) Soooo much easier than trying to clean it up with a million cotton buds!


I feel like I've done a gradient in these exact same colours before with a glitter on the ring finger. For some reason, this is just the colours I always pick up when I want to do a gradient.
Do you guys have any colour suggestions for my next gradient? I need to get out of my pink to purple to blue gradient rut haha.

Thanks for visiting! ♥

Monday, July 29, 2013

piCture pOlish Blog Fest 2013 - Celebrating the Year of the Blogger

Hi ladies! I hope you all had a lovely weekend! :)
Today I have a super exciting post for you! Today is Aussie brand piCture pOlish's annual Blog Fest! Some bloggers all around the world have been chosen to share some piCture pOlish shades and create a nail design with them. I am so so so excited to be one of those chosen bloggers. :) This is my first time using piCture pOlish polishes!

The 3 polishes I have are Ariel's Tale (a clear base with ocean green glitters), Ocean (a light blue jelly with a holographic sparkle), and Flirt (a bright pink creme). But for now, here is the nail art I came up with...
**Please excuse how nubby and short my nails are right now! But hey, this blog IS 'Ten Little Nubs'... ;)**


On most of my nails I used 2 coats of Ocean as a base and added hearts using Flirt! ♥


On my thumb & ring finger I have created a gradient with Flirt as a base. I sponged on some of Ocean, which created a really pretty dark blue colour over the pink, and then I painted a bit of Ariel's Tale over the top for more sparkle. :)

I even went "on location" to the beach to photograph these! ;)

And here's how I achieved each of the designs...


Click on photo to view larger version...
1. Paint nails with 2-3 coats of Ocean.
2. Paint a square using 2 coats of Flirt onto a zip lock bag. Leave to dry for at least 3 hours.
3. Peel off carefully using tweezers.
4. Use a small heart hole puncher to cut out heart shapes.
5. Add slow-drying top coat to nails and place Flirt hearts using tweezers.
6. Add a generous layer of a fast dry top coat.

Click on photo to view larger version...
1. Paint nails with 2 coats of Flirt and leave until completely dry.
2. Paint strips of Flirt and Ocean onto a makeup sponge. Stamp sponge onto nail to blend colours. Repeat 2-3 times.
3. Add a coat of Ariel's Tale to 2/3 of nail.
4. Clean up cuticles with acetone and a makeup brush, then add a generous layer of a fast dry top coat.

Hope you enjoy this look! I absolutely love the gradient. ♥ I may wear it as a full manicure soon. If you try out either of the looks using my tutorials please send me a photo on Instagram or Twitter! Use the hashtag #tenlittlenubslook so I can see it (I sometimes miss photos in my feed). This goes for any design you see on my blog too. :)

If you'd like to vote for me in the piCture pOlish Blog Fest please click HERE and fill out the form! You could even win some polish for yourself!! Thank you sooo much. xx

Later this week I'll be posting a full swatch & review of the 3 piCture pOlishes in this post. :)

piCture pOlish is available at picturepolish.com.au, and they ship worldwide. They're also available from a few international etailers. Check that out on their Network page. They have soooo many colours to choose from. Everyday Deals

piCture pOlish on Twitter | Facebook | Instagram | YouTube | Google+ | Pinterest

*Product(s) in this post were provided to me by the company or PR for my 100% honest review. For more info please read my Disclosure Policy

Monday, July 1, 2013

ANMonday - Sci Fi

Hi guys! I hope you had a lovely weekend! I had a pretty good one despite getting sick halfway through! My family has had a yucky cold recently and I've just caught it too. :(

So for this theme I actually had to look up what was classified as sci fi. LOL. A little embarrassing but whatever. IMDB told me that superhero movies are considered sci fi. And superhero movies are my favourite movies sooo it's no surprise that that's what I did! Actually, a lot of movies that I would've considered to be more 'action' movies are supposedly 'sci fi', so that's interesting.

Last week the Man of Steel movie came out and I am soooo excited to see it! I'll probably see it this weekend. :) So of course for today's ANMonday I did Superman nails!


I did a gradient of Pretty Serious Santa's Sunburn (the most incredible red shimmer EVER!) and Pretty Serious BSOD for the base, and then stamped with plate FUN2 and a silver stamping polish. I got the plate and polish from My Online Shop. The stamping is definitely NOT perfect, LOL, but I'm sick and wanted to get the mani finished before the sun went down sooo that's my excuse.


Excuse any sparkles you may see around my skin. The gradient was sooo hard to clean up!

Have you seen/are you excited to see Man of Steel?! I heard that it's quite long... but I hope I still like it. :) I've heard it's great otherwise! And what is your favourite sci fi movie?

Sunday, June 2, 2013

I'm over at More Nail Polish!

Hey guys!
Today I'm over on More Nail Polish! :) Cathy is an amazing blogger and I'm so honored to be able to guest post for her today while she's away on holiday.
You may have actually seen this mani on my Instagram a couple of weeks ago.
Here's a peek at the mani I did for her blog, click HERE to see more! :)
Thanks again Cathy for having me over on your blog! Hope you're having a great time away.

 photo siggy_zps5e5fc22a.png
Twitter || Facebook || Instagram || YouTube

Tuesday, May 7, 2013

Iron Man Nail Art!

Hey guys! Hope you didn't miss me too much, sorry I haven't blogged in a few days!
Today's post is brought to you from my iPhone. Because I forgot to take proper photos before I removed this... Woops! :)
On the weekend my boyfriend and I went to see Iron Man 3 and I was soooooo excited. :D My absolute favourite types of movies are cheesy teen movies (Disney woot) and Superhero movies! :D So I did some Iron Man nail art!
I was inspired by the lovely Teneil and Naomi for this design!
I used my favourite red polish, Butter London Pillar Box Red as my base on all nails but my ring, with a gradient of OPI Goldeneye (not my best gradient... lol). On my ring finger I've used China Glaze Passion and BL Pillar Box Red, with a teeny bit of Sally Hansen Celeb City (eyes) and a black nail art pen for the outline.
My boyfriend even wore his red & gold Crux watch. ;)

I love doing movie inspired nail art. :D I hope to have some more coming up in the future for some awesome new movies coming out this year.
I absolutely LOVED Iron Man 3! :)
What movies are you excited to see?

 photo siggy_zps5e5fc22a.png
Twitter || Facebook || Instagram || YouTube