I couldn't resist sharing a close up shot of Rimmel's Aurora.
Showing posts with label Born Pretty Store. Show all posts
Tuesday, February 4, 2014
Love Month. Day 4: Cutesy V-Day Water Decals.
Thursday, January 30, 2014
Beachy.
Born Pretty also sell super cute accessories, like this bright turquoise coloured rubber watch! These watches only cost $5.99 and come in 9 fun colours.
Labels:
Blue,
Born Pretty Store,
Face Of Australia,
Glitter,
Gold,
NAILS,
Nude,
OPI,
Review
Thursday, January 9, 2014
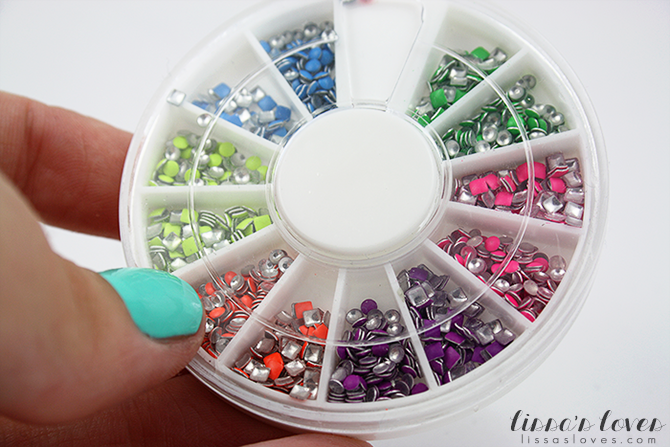
Born Pretty Store Neon Stud Wheel {Review}
Labels:
3D,
Blue,
Born Pretty Store,
China Glaze,
Creme,
Green,
NAILS,
Neon,
Pink,
Purple,
Review,
Ulta3,
White
Tuesday, November 5, 2013
Getting Back Into Stamping.
I've been wanting to get back into doing more nail art recently, but I'm not very good at coming up with ideas; hence why I'm always doing 'inspired' manicures.
Well, today's nail art is inspired by something - but it's not somebody else's nail art.
I started by creating a gradient with Essie A Crewed Interest, Revlon Buttercup and Essie Mint Candy Apple. My gradient was inspired by this picture from Pinterest. :)
{ I have a gradient tutorial video here if you are interested in seeing how I did this. }
I have been wanting to work on my stamping skills also, and I felt the gradient was too plain.
I stamped over the gradient using the flip flop images from Bundle Monster plate BM-309. I used this black polish from Born Pretty to stamp with. I kind of wish I hadn't stamped over the gradient - it looked prettier on its own. Oh well. *sigh*
Thanks for visiting! ♥
I stamped over the gradient using the flip flop images from Bundle Monster plate BM-309. I used this black polish from Born Pretty to stamp with. I kind of wish I hadn't stamped over the gradient - it looked prettier on its own. Oh well. *sigh*
Thanks for visiting! ♥
Labels:
Born Pretty Store,
Bundle Monster,
Creme,
Essie,
Gradient,
Mint,
NAILS,
Peach,
Personal,
Revlon,
Stamping,
Yellow
Friday, October 25, 2013
Halloween Sprinkles Nail Art!
REMINDER: My blog sale is still live! I just added some new polishes to it yesterday, and reduced the prices on almost everything on there! There's still about 80 polishes available in the sale. :)
After recreating jauntyjuli's Halloween Cupcake manicure the other day, I really wanted to do some more Halloween nail art. I'm not into anything gory or creepy though, so I still wanted to keep it cutesy.
I find it quite hard to come up with my own designs for nail art and usually end up doing recreations of other manicures I've seen online, but this design I didn't recreate! I came up with it on my own. :D I was quite proud of that, even though it's a fairly basic design haha.
I've seen sprinkle/icecream manicures many times before - but never a Halloween icecream/sprinkle manicure! :D
For this design I used:
Sinful Colors Black on Black
Essie Fear or Desire
Born Pretty Store Glow in the Dark polish #03 {layered over 1 coat of white}
Essie Play Date
Femme Fatale Cosmetics Tricky Treat {discontinued - sorry!}
On my right hand I used the same colours, but mixed up the design.
On the black nails I did a polka dot design, kept the glitter on the ring finger the same, and stamped on my pointer and middle finger with Winstonia plate W116. I haven't stamped in a while so it's pretty rusty but it'll do, hehe.
This is by far the craziest nails I have worn... maybe ever! Yes, I did leave the house wearing these nails. :| Most of the time when I do nail art that's not subtle, it's just for fun and I don't actually wear it as a manicure. Buuuut, these I did.
Hope you enjoyed. Thanks for visiting ♥
----------------------------
After recreating jauntyjuli's Halloween Cupcake manicure the other day, I really wanted to do some more Halloween nail art. I'm not into anything gory or creepy though, so I still wanted to keep it cutesy.
I find it quite hard to come up with my own designs for nail art and usually end up doing recreations of other manicures I've seen online, but this design I didn't recreate! I came up with it on my own. :D I was quite proud of that, even though it's a fairly basic design haha.
I've seen sprinkle/icecream manicures many times before - but never a Halloween icecream/sprinkle manicure! :D
For this design I used:
Sinful Colors Black on Black
Essie Fear or Desire
Born Pretty Store Glow in the Dark polish #03 {layered over 1 coat of white}
Essie Play Date
Femme Fatale Cosmetics Tricky Treat {discontinued - sorry!}
On my right hand I used the same colours, but mixed up the design.
On the black nails I did a polka dot design, kept the glitter on the ring finger the same, and stamped on my pointer and middle finger with Winstonia plate W116. I haven't stamped in a while so it's pretty rusty but it'll do, hehe.
Hope you enjoyed. Thanks for visiting ♥
Wednesday, September 4, 2013
Born Pretty Texture Minis (Set #15)
Hi guys! I recently made an order from Born Pretty Store entirely using my BPS points I've accumulated over {a long} time! To get BPS points, all you have to do is write reviews on the site for items you've previously purchased and upload photos of the items you've purchased. It takes a while to build up enough points to make an order but once you have enough, you can get a big discount off your order or even get your whole order FREE. This is so awesome for people who order a lot from there! I've been ordering from them for about 2 years now so I had quite a few points saved up. :D
In my order I got a mini set of textured polishes. I chose set #15 which includes four 6mL textures in pink, orange, purple, and blue. I decided to swatch these for you guys in a little skittle sort of mani, since I don't think I've seen any other swatches of them around.
pink
This is a rosy red-y pink (I kinda can't decide whether to call it red or pink) jelly filled with silver glitters, with a textured finish.
orange
The orange texture has more of a shimmery base rather than jelly {which the other polishes in this set have}. It also has some golden orange micro glitter/shimmers.
blue
Blue jelly with silver glitters, with a textured finish. Absolutely gorgeous and probably the most sparkly out of the set.
purple
Purple jelly base with silver glitters, with a textured finish. A little thicker in formula than the rest.
These all had a very nice formula. Not too thick, not too thin and all were opaque in two coats. I think the blue had the best formula of them all, however. The purple was the thickest but not too bad that you can't work with it. They didn't take too long to dry which was very nice. They're so sparkly and beautiful in the sun, but still beautiful in the shade.
I thought I should mention that these four polishes do resemble some of the colours from the Zoya Summer 2013 PixieDust collection and that is the main reason why I purchased them. I would love to be able to get my hands on the Zoyas but they're just not accessible here at all and cost a fortune online, so these are the next best thing! :D I was super happy that these Born Pretty polishes dried fairly quickly as well.
After posting a little swatch video on my Instagram, some lovely people told me that these are basically identical to the Zoya colours. BOOYAH! ;)
Thanks for visiting! ♥
In my order I got a mini set of textured polishes. I chose set #15 which includes four 6mL textures in pink, orange, purple, and blue. I decided to swatch these for you guys in a little skittle sort of mani, since I don't think I've seen any other swatches of them around.
This is a rosy red-y pink (I kinda can't decide whether to call it red or pink) jelly filled with silver glitters, with a textured finish.
orange
The orange texture has more of a shimmery base rather than jelly {which the other polishes in this set have}. It also has some golden orange micro glitter/shimmers.
blue
Blue jelly with silver glitters, with a textured finish. Absolutely gorgeous and probably the most sparkly out of the set.
purple
Purple jelly base with silver glitters, with a textured finish. A little thicker in formula than the rest.
These all had a very nice formula. Not too thick, not too thin and all were opaque in two coats. I think the blue had the best formula of them all, however. The purple was the thickest but not too bad that you can't work with it. They didn't take too long to dry which was very nice. They're so sparkly and beautiful in the sun, but still beautiful in the shade.
I thought I should mention that these four polishes do resemble some of the colours from the Zoya Summer 2013 PixieDust collection and that is the main reason why I purchased them. I would love to be able to get my hands on the Zoyas but they're just not accessible here at all and cost a fortune online, so these are the next best thing! :D I was super happy that these Born Pretty polishes dried fairly quickly as well.
After posting a little swatch video on my Instagram, some lovely people told me that these are basically identical to the Zoya colours. BOOYAH! ;)
Thanks for visiting! ♥
Wednesday, August 14, 2013
Born Pretty Store Fluorescent Polish #14 + Stamping Plate MLS301
Hi guys! Today I have a nail polish and stamping plate from Born Pretty Store to share with you. :) I really love both of these items and am so excited to share them with you! :D
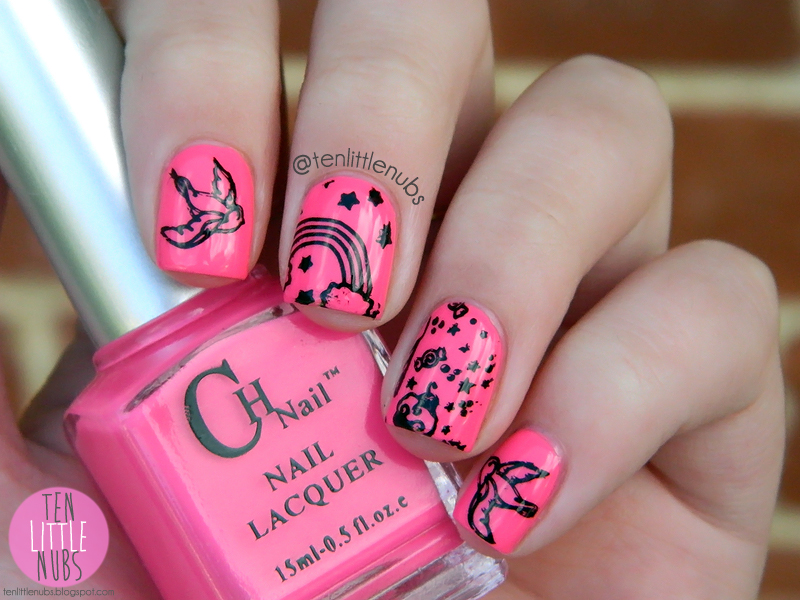
This polish is from their Fluorescent section and this is #14. It's a bright pink. Not the brightest in my collection but still really bright! I have been on the hunt for a perfect neon/bright pink polish and this is definitely a nice one! :) It would be a really nice pedicure colour for summer, too.
This polish has a rather thick formula but not really in a bad way. :) Of course if it's too thick for you, you can add a little polish thinner to it. The formula is not very self-levelling (possibly could be fixed by adding some thinner), but a good top coat will sort that out. It also has a nice wide brush that I found really easy to control and covers the nail really easily too.
This polish is 15mL for $4.99 USD.
I used 3 coats and added 1 coat of Seche Vite top coat to help it level out and dry fast.
(I have also just realised that this polish is supposed to glow under black light/UV light and I didn't test it under mine! I might have to re-swatch it and show you guys!
Update: I tried putting it under my UV lamp and it didn't glow...)
Here is a comparison between some other neon pinks in my collection (photos taken from my iPhone because it photographs neons much better than my camera!):
Pointer to pinky: Ulta3 Fruit Tingle (2 coats), Born Pretty #14 (3 coats), China Glaze Shocking Pink (3 coats), Color Club Jackie Oh! (2 coats).
In person the Color Club and China Glaze polishes are the brightest, with Ulta3 being a little less neon. The Born Pretty polish is the least neon out of all of these. But it is still really bright. :) The colour is quite similar to Ulta3 Fruit Tingle.
This is the stamping plate MLS301. I'm not an expert at stamping but I would say I'm okay at it so I hope I do a good job at reviewing this plate for you guys!!
The plate comes with a blue protective plastic over the plate which you have to peel off before you can use it. (I have already done this obviously.) Be careful because this plate is a quite sharp at the edges. This plate has 11 images (sort of, lol). Two birds, a rainbow, an icecream/cupcake/sweets design, some stars, a lightning bolt and some little candies.... and I'm not quite sure what the thing at the bottom is supposed to be lol.
This plate costs $2.99 USD.
I just randomly stamped some of the images onto my nails over the pink nail polish. I found this plate to be really great quality for such a cheap plate! Absolutely fantastic quality. I had no trouble whatsoever picking up the images and getting them to stamp well! I was seriously impressed! :)
This polish has a rather thick formula but not really in a bad way. :) Of course if it's too thick for you, you can add a little polish thinner to it. The formula is not very self-levelling (possibly could be fixed by adding some thinner), but a good top coat will sort that out. It also has a nice wide brush that I found really easy to control and covers the nail really easily too.
This polish is 15mL for $4.99 USD.
I used 3 coats and added 1 coat of Seche Vite top coat to help it level out and dry fast.
(I have also just realised that this polish is supposed to glow under black light/UV light and I didn't test it under mine! I might have to re-swatch it and show you guys!
Update: I tried putting it under my UV lamp and it didn't glow...)
Here is a comparison between some other neon pinks in my collection (photos taken from my iPhone because it photographs neons much better than my camera!):
Pointer to pinky: Ulta3 Fruit Tingle (2 coats), Born Pretty #14 (3 coats), China Glaze Shocking Pink (3 coats), Color Club Jackie Oh! (2 coats).
In person the Color Club and China Glaze polishes are the brightest, with Ulta3 being a little less neon. The Born Pretty polish is the least neon out of all of these. But it is still really bright. :) The colour is quite similar to Ulta3 Fruit Tingle.
This is the stamping plate MLS301. I'm not an expert at stamping but I would say I'm okay at it so I hope I do a good job at reviewing this plate for you guys!!
The plate comes with a blue protective plastic over the plate which you have to peel off before you can use it. (I have already done this obviously.) Be careful because this plate is a quite sharp at the edges. This plate has 11 images (sort of, lol). Two birds, a rainbow, an icecream/cupcake/sweets design, some stars, a lightning bolt and some little candies.... and I'm not quite sure what the thing at the bottom is supposed to be lol.
This plate costs $2.99 USD.
I just randomly stamped some of the images onto my nails over the pink nail polish. I found this plate to be really great quality for such a cheap plate! Absolutely fantastic quality. I had no trouble whatsoever picking up the images and getting them to stamp well! I was seriously impressed! :)
**Please remember that stamping DOES take some practice! If you have never stamped before, you will most likely not find it very easy. If you'd be interested in a stamping basics post or video, let me know.**
I used a Winstonia stamper and a gift card as my scraper. I stamped with a Born Pretty stamping polish in black which I purchased a few months ago and am only just now giving a try. I absolutely adore the stamping polishes from Born Pretty Store, they really work very well and they are so super cheap!
I actually really loved the way the black stamping looked over the pink. I will have to do some more pink + black manis soon. :)


Hope you enjoyed this review!
Thanks for visiting ♥
I used a Winstonia stamper and a gift card as my scraper. I stamped with a Born Pretty stamping polish in black which I purchased a few months ago and am only just now giving a try. I absolutely adore the stamping polishes from Born Pretty Store, they really work very well and they are so super cheap!
I actually really loved the way the black stamping looked over the pink. I will have to do some more pink + black manis soon. :)


You can get 10% off your Born Pretty Store order with the code CAL91. They also have free worldwide shipping. :)
*Product(s) in this post were provided to me by the company or PR for my 100% honest review. For more info please read my Disclosure Policy*
Hope you enjoyed this review!
Thanks for visiting ♥
Labels:
Born Pretty Store,
Jelly,
Neon,
Pink,
Review
Subscribe to:
Posts (Atom)